android.widget.TextView 에서 setTextSize() method 를 보면,
파라미터가 scaled pixel 이라고 되어 있다.

조심해서 쓰자 -_-;

단위까지 표현하고 싶다면 파라미터 2개짜리 method 를 사용하면 된다.

public void setTextSize (float size)

Since: API Level 1

Set the default text size to the given value, interpreted as "scaled pixel" units. This size is adjusted based on the current density and user font size preference.

Related XML Attributes
Parameters
size The scaled pixel size.

public void setTextSize (int unit, float size)

Since: API Level 1

Set the default text size to a given unit and value. See TypedValue for the possible dimension units.

Related XML Attributes
Parameters
unit The desired dimension unit.
size The desired size in the given units.
:
layout 관련
http://rednine.tistory.com/398?srchid=BR1http%3A%2F%2Frednine.tistory.com%2F398
http://blog.naver.com/PostView.nhn?blogId=huewu&logNo=110083649927&redirect=Dlog&widgetTypeCall=true#


맵 관련
http://gtko.springnote.com/pages/5409245

http://lomohome.com/316
http://stbaeya.com/tc/215?TSSESSIONstbaeyacomtc=22fef63e7ee321167de9fad2405c475b


multi resolution screen 지원 관련
http://www.slideshare.net/mosaicnet/-5187233
http://www.androes.com/90
http://theeye.pe.kr/entry/few-tips-for-android-programmer-and-ui-designer

preferences 관련
http://rsequence.com/android_blog/node/64


맥에서 안드로이드 하기
http://weasel02.tistory.com/entry/JAVA안드로이드-개발환경-설치하기-For-MAC


xml 관련
http://genieus.tistory.com/76


Content Provider 관련
http://gtko.springnote.com/pages/5151085
http://rsequence.com/android_blog/node/69


커스텀 다이얼로그
http://blog.androgames.net/10/custom-android-dialog/


activity 를 다이얼로그처럼 쓰기
http://comxp.tistory.com/141


Geocoder and reverse Geocoder
http://pheadra.tistory.com/entry/Geocoder-and-Reverse-Geocoding


apk 파일 만들기
http://www.squarelab.net/LectureBoard/2830


Custom Android Button Style and Theme
http://blog.androgames.net/40/custom-button-style-and-theme/


폰트 관련
http://rednine.tistory.com/278


안드로이드 Intent에서 앱 호출하는 방법을 정리
http://nuninaya.tistory.com/580


Rotation and GL Overlay in Android
http://blog.graphtech.co.il/rotation-and-gl-overlay-in-android/


마켓 등록
http://blog.naver.com/PostView.nhn?blogId=drparksc&logNo=20118204397


배포용 키 & apk 등
http://roter.pe.kr/125
http://appleandroidjunhulove.tistory.com/tag/%EC%95%88%EB%93%9C%EB%A1%9C%EC%9D%B4%EB%93%9C%20%EB%A7%88%EC%BC%93%20%EB%B0%B0%ED%8F%AC


이클립스 git 사용하기
http://hightin.tistory.com/16
:
대략 아래와 같이 하면 됨.
만약 설정에서 GPS 를 disable 시킨 상태라면 false 가 리턴 됨.


:
안드로이드에서 네트워크를 이용하는 어플인 경우, 현재 네트워크 상태를 다음과 같이 체크 할 수 있다.


* 다음은 안드로이드 레퍼런스 사이트에서 일부 발췌.

public boolean isAvailable ()

Since: API Level 1

Indicates whether network connectivity is possible. A network is unavailable when a persistent or semi-persistent condition prevents the possibility of connecting to that network. Examples include

  • The device is out of the coverage area for any network of this type.
  • The device is on a network other than the home network (i.e., roaming), and data roaming has been disabled.
  • The device's radio is turned off, e.g., because airplane mode is enabled.
Returns
  • true if the network is available, false otherwise

public boolean isConnected ()

Since: API Level 1

Indicates whether network connectivity exists and it is possible to establish connections and pass data.

Returns
  • true if network connectivity exists, false otherwise.


* Manifest 에서 ACCESS_NETWORK_STATE 권한을 설정해야 함.
:

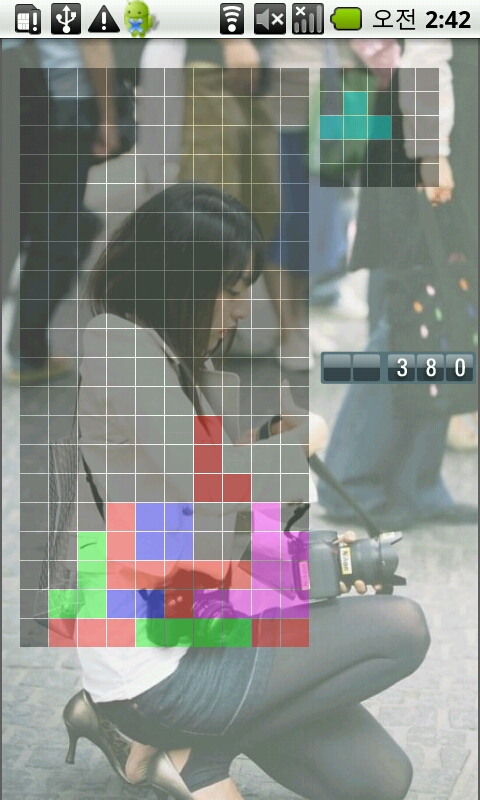
사용자 삽입 이미지


지난 번에 만들었던 안드로이드 테트리스는 그야 말로 첨으로 만들어 본 수준이었고,
게다가 에뮬레이터와 QWERTY 가 있는 옵티머스Q 에서만 테스트 되었기 때문에
키패드가 없으면 게임을 할 수 없는(-_-) 치명적인 단점이 존재했습니다 ㅠㅠㅠㅠㅠㅠㅠㅠ

어쨌든 이왕 하는 김에 제대로 완성되고 돌아가는 걸 한 번 만들어 보자는 생각에,
새롭게 게임을 만들었습니다.

코드는 구글 코드에 있고, Apache License, Version 2.0 을 채용 했습니다.
모든 코드는 제가 다 직접 코딩 했습니다. (다른 사이트 참고 하면서 많이 배우면서 하긴 했습니다만 ^^;;)
때문에 저의 코드를 이용하는 데는 제한이 없습니다. (그런 사람도 없겠지만 ...)
물론 상업적으로도 이용가능합니다(만 테트리스라는 게임에 라이센스가 있어 그럴 순 없겠죠 ? ^^;;;)
(테트리스 저작권 관련 글 : http://114copyright.tistory.com/24 )
숙제 할 때 코드를 쓰든, 상업 코드에 이용하든 관계 없습니다. 알아서들 하시고 ...


구글 코드 : http://code.google.com/p/babotetris/
svn 으로 다운 받을 수 있습니다.
 svn checkout http://babotetris.googlecode.com/svn/trunk/ .

조작 하는 방법은 대략 2 가지 모드가 있는데,
터치 모드는 좌/우/상/하 로 화면을 쓸면 됩니다.(Fling)
버튼 모드는 화면을 3등분 해서 왼쪽을 터치하면 좌, 오른쪽을 터치하면 우,
가운데를 터치하면 블럭이 회전 합니다.
(게임 화면에서 메뉴 버튼을 눌러 보세요 ~ )

아직 버그도 있고, 덜 완성 되었습니다만, 그래도 일단 게임이 되긴 하므로 공개합니다 ^^;
당분간은 update 될 것 같군요.
(개발과 테스트는 주로 옵티머스Z 에서 합니다)

그냥 연습용으로 만들어 본 거라 마켓에 올릴 생각은 없습니다.
(라이센스 문제도 있고 ^^; 사진도 임의로 올린 거라 ... ^^;;;;)


- 기록 페이지는 미완성

- 영어가 konglish 임 ㅠㅠㅠㅠㅠㅠ

- 코드에 영혼을 담으려 하였으나, 일부 미숙할 수 있음


:
새로 만든 안드로이드용 테트리스 보기 : http://seirion.com/198


안드로이드 책보면서 첨으로 만든 테트리스
에뮬레이터에서는 이렇게 이쁘게 나온다.

사용자 삽입 이미지


이놈을 옵티머스Q 에 올렸더니, 괜찮은가 싶었는데 가로로 누으니 이렇게 작아진다. ㅡㅡ;;

사용자 삽입 이미지


사용자 삽입 이미지


대략 구글링 해 보니, 항상 세로로 나오게 하려면 manifest 파일에서
Activity 에 다음 속성을 주면 된다.

android:screenOrientation="portrait"

그렇게 했더니 쿼티가 나와있어도 세로 방향으로 유지가 된다.

사용자 삽입 이미지


근데 또 이놈이 세로-가로 방향이 바뀔 때마다 게임이 계속 새로 시작한다.
구글링 해 보니, 방향이 바뀌면 Activity 가 사망했다가 다시 시작한다고 한다. ㅠㅠ
--> 라고 생각했는데, 또 생각해보니 쿼티가 들락날락하기 때문에 그런 거 같다
더 알아보고 써야 겠당 ㅠㅠㅠ

:


이 귀찮은 첫 줄을 없애고 싶을 때,
대략 Activity 클래스의 onCreate 함수에서 다음 함수를 호출하면 없어진다.
단 setContentView() 보다 먼저 호출 해야 함. (안 그럼 프로그램이 사망한다.)


(밑에 이 타이틀바가 없어진다.)

사용자 삽입 이미지


대략 AndroidManifest.xml 파일을 다음과 같이 고치면 위와 비슷하게 된다.

아래와 같이 하면 상태바까지 사라진다. 직접 해 보시라 ~
:
XML 레이아웃에 본인이 작성한 View 를 넣고자 할 때,


AnotherView 클래스에서는 생성자를 오버로딩 하면 된다.


여기서 만약, 파라미터 2개짜리인 생성자를 오버로딩 하지 않으면 안 좋은 일이 일어난다.
궁금하다면 직접 해 보시라 ~

:

activity 시작 할 때,
onCreate() 함수에서 바로 View::getWidth() 나 View::getHeight() 를 호출하면 0을 반환한다.
요럴 때, 다음과 같이 하면 크기가 얻어진다.
혹시 더 좋은 방법 알고 계신다면 리플 달아주시길 ...


:
http://www.android.com/


http://java.sun.com/javase/downloads
JDK 6 Update 16


http://www.eclipse.org/downloads
Eclipse IDE for Java Developers

you may download the compressed file(zip or tar) and just uncompress it on your system.
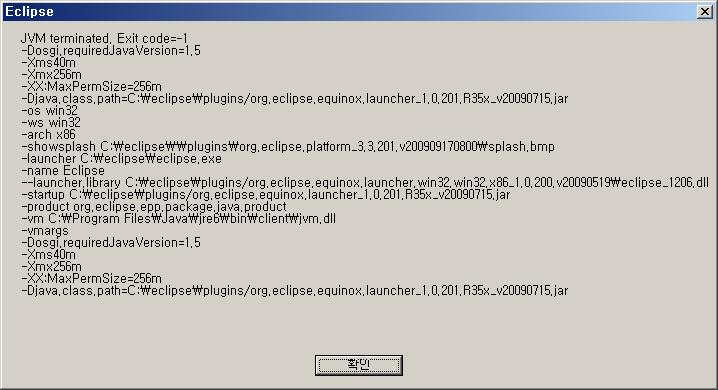
if you see the message box below ...

사용자 삽입 이미지


you may edit eclipse.ini file like below. (you need to add the path of JDK installed)

-vm
C:\java\jdk\bin\javaw.exe


http://developer.android.com/sdk/


you need to download a compressed file(zip or tar) and uncompress it on your system.
you need to add the path of tools (sub driectory of the uncompressed file) on your system.

1) windows (i will add it later -_-;)
2) unix/linux/osx
you may edit .bashrc (or .bash_profile) file.

export PATH=$PATH:THE_PATH_YOU_NEED_TO_ADD


installation Android Development Tools Plug-in
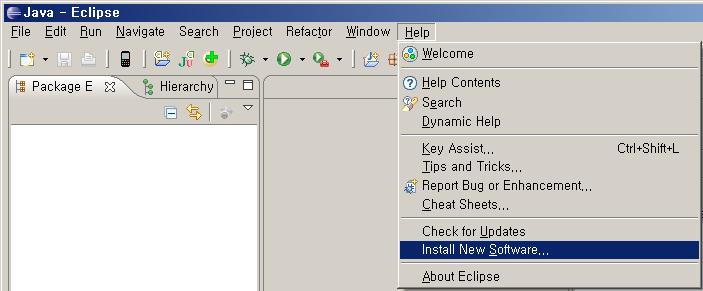
1. run Eclipse and open menu [Help]-[Install New Software...]

사용자 삽입 이미지


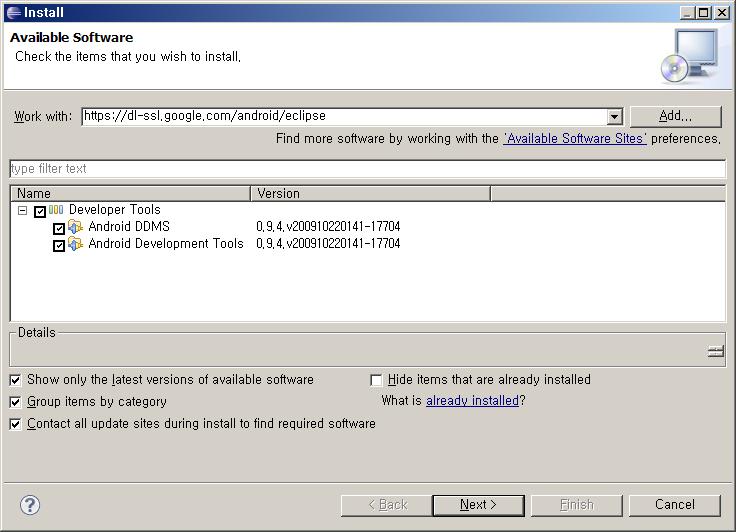
2. fill the "Work with: " field using "Add" button. and check "Developer Tools"

사용자 삽입 이미지


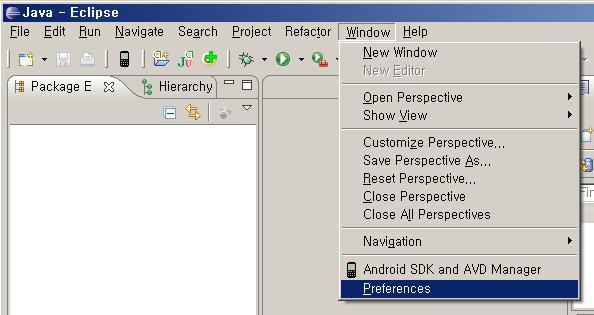
3. restart Eclipse after installation. and add the path of Android SDK
from the menu [Window]-[Preferences]

사용자 삽입 이미지


select "Android" on the left side and set the "SDK Location".

[+]
[Window] - [Android SDK and AVD Manager]
select "Available Packages" on the left tab.
and select all or some what you install on the right tab. then gogogogo


oooooooops !!! it's kae-sap-zil to upload images T.T
: